Showing posts with label Photography. Show all posts

Monday, 8 July 2013

Beginner Photography Tips

Windermere
Saturday I spent the day with a friend who has just purchased his first DSLR camera and he has joined the Canon club. He has purchased a Canon EOS 1100D Digital SLR Camera (inc. 18-55 mm f/3.5-5.6 DC III Lens Kit), which is a great starter camera for someone who wants to get into taking photos with a DSLR. He had asked me for a few tips and I was able to point out a lot of the key aspects of the camera. The problem with just telling someone what a button is and what it will do, is this will mean very little to someone until they can use it. There is so much to learn and remember, it really does blow your mind to get to grips with everything you need to remember when taking photos. It has taken me years, and still I am learning. I have made endless mistakes when I've forgotten to readjust one of the settings on my camera.

The best way to get to grips with anything, is to use it, so a day out photographing was planned. We headed up to the beautiful Lake District. The good thing about photographing nature and landscape, is unlike people it won't get bored of waiting for you to figure out what setting you need to put your camera on.

Here are a few things to remember when taking photos.

Think about Composition

Rule or ThirdsIt's important to think about the composition of your photograph - the position of the different elements in the frame. The simplest rule of thumb to learn and remember is the Rule of Thirds. You will need to split your frame into nine squares. This makes a more dramatic and visually interesting photo, than one where the subject is dead in the centre. Many newer cameras have a rule of thirds overlay that you can switch on when shooting.

As an example if, you are taking a photo of landscape with sky in, you should have 2 thirds of the photo sky and 1 third land, or 2 thirds land and 1 third sky. It will depend on what you want the focus in the photograph to be. If there sky looks particularly dramatic, or it is sunset, you will probably want 2 thirds sky.

Rule of Thirds

Think About Lighting

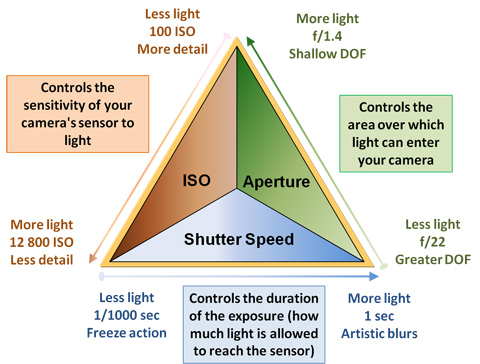
There are 3 ways you can manipulate the amount of light you allow into your image, the shutter speed, aperture size and ISO. You will need to consider how dark it is, if you want the background to be out of focus and if you want some artistic blur. This Exposure Triangle can help to explain the purpose of those three features.

The Exposure Triangle

The Exposure Triangle

Adjust the ISO
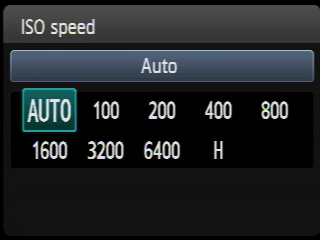
There is an option to put the ISO on Auto and let the camera decide for you, but the sooner you can start adjusting this and making a decision about how you want your camera set up the better. For a very bright sunny day you want to set it is an ISO of 100. If it is beginning to get dark or you are taking photos indoors you will need to move the ISO up. The best thing is to start at 100 and move up from there. The higher the ISO the more grainy the photo will be.

The Aperture Priority mode helps control the amount of depth in your final photograph.
Aperture priority mode
You can adjust the aperture on the camera when it is either in manual mode or Aperture priority mode. On the Canon camera, it is located on the wheel as AV (aperture value), on the Nikon, it is A. The lower the aperture number, the larger the aperture is and the shallower the depth of field. So an aperture of f1.4 will have a shallow depth of field and the background will be out of focus, an aperture of f11 will have a larger depth of field and you should have most things in focus. If photographing an individual object or person, I usually use F5.6 and below. If photographing a group of people or landscape I would usually use F8 and above.

Shutter speed priority mode
As with aperture, you can adjust the shutter speed either on manual mode or shutter speed priority mode. On the Canon camera, it is located on the wheel as TV (time value), on Nikon, it is S. I don't often use the shutter speed priority mode on my camera. However if I was photographing flowing water and wanted the water to look like it was moving (artistic blur), I would use a slow shutter speed. When using a slow shutter speed you need to use a tripod, as you won't be able to keep the camera still enough. If you don't have a tripod to hand, you can use a wall or your camera bag to rest your camera on. Another good tip is to use the self timer so there isn't any camera shake when you press the shutter release button.

If taking the photo without a trip or something to rest it on you want to avoid going any lower the 1/125 s. If you are going to be holding your camera and need to go below 1/125 because of lighting issues, this is when you need to consider adjusting something else to get in more light (lower aperture or higher ISO).


A good book for explaining exposure better is - Understanding Exposure, 3rd Edition: How to Shoot Great Photographs with Any Camera


White Balance (WB)


You can set your camera to automatic white balance (AWB) and the camera will try and set the white balance according to the type of light you are shooting in. Different type of light casts different type of colours. However it is good to understand what the White Balance symbols mean so you can adjust them yourself rather than letting your camera make the decision for you. The image to the left should help you to work out which setting to choose according to the conditions. For example, if it's a bright sunny day you should select day light, if you are indoors and there are lights on you should determine what type of lights are being used. You can check your photo after taking it, if you are using a digital camera, to make sure the colour of the photo looks true to what you see.

If the White Balance is a little off, you can always adjust this afterwards in your editing software.

Consider Post Editing

Some may think that if you need to edit your photo you haven't taken a good photo to begin with. However photographers who used the traditional method of film and darkroom did their own editing in the processing process in the darkroom. Today the dark room is our computer. By doing small edits like cropping, straightening, colour correction, adjusting exposure, removal of red-eye etc.. the quality of your photos will be dramatically improved.

The goal is to take a good photo in the camera, but there's no harm in touching up a photo after it's taken.

The software I use is Lightroom for most of my edits, it's fast and easy to use. For a more in-depth edits such as removing an object from a photo, I would use Photoshop. There is other software you can use for free such as Picasa.

And remember to be selective of what photos you share with others. If you take 200 photos while on a day out, you don't need to show them all to your friends. Select the best and share those. The beauty of digital is you can take many photos and it doesn't cost you anything to develop them.

Here are a few photos from my trip out on Saturday. Enjoy.......


Near Sawrey


Wednesday, 19 June 2013

The Art of Photography

I found this debate online Is photography art? I have to say some of the answers of those saying no it isn't art, did make me a little frustrated. One person suggested "Well photography is nothing more than a person standing there and taking a picture. Anyone can do it." It is true that digital cameras have made it a lot easier for more people to take good quality photos, but the best photos aren't just taken casually, we don't just "stand there". It takes time, knowledge, patiences, a creative eye to see something the average person wouldn't see. For some of the best landscape photos a photographer has waited for hours to catch the perfect time to take that one photo. That certainly isn't a snap shot.

I have taken photos my whole life, but have taken it more seriously over the past 12 or so years. I definitely have a natural eye for creativity, I always have done. What has let me down has been my knowledge of the use of the camera, this I am learning and probably won't stop learning. The camera is the tool, we need to learn how to use it and then put a creative touch to that. Does a painter not need tools, a paint brush and paints and does he not need to learn how to use those tools?

I have always thought of photography as an art form, I know I have a long way to go before I have mastered that art form, but I will keep on learning. I think Ansel Adams put it perfectly, "You don't take a photograph, you make it".


Friday, 31 May 2013

Wedding Day Photography Tips

Location
First of all see if the reception venue has some good places for having the photos taken. Take a tour of the venue to check it out. If you feel there isn't enough, space or places of interest to take the photos, suggest to the couple that you look for an alternative location. Things to look for to give your photos more interest;
  • columns
  • arches
  • stairs
  • bridges
  • park bench
  • beautiful tall trees
  • beach
  • water/pond/lake

Fun bridal party shots

Formal photos are great for showing who was at a wedding, but it's also good to have some fun. The bridal party (best man, grooms men, maid of honour, brides maids) is often made up of those closest to the bride and groom, so why not have some fun and take some photos that they will love to look back at for years to come.


Candid Moments

Some of the best moments of any event, but especially a wedding are not set up and are captured unaware. This is where a 2nd photographer comes in use. While the main photographer is taking the official photos, the 2nd photographer can be taking photos from other angles, mixing amongst the other guests.


Capture the details

Many months of effort goes into preparing for that one day. If you've ever come away from a wedding thinking, that was a beautiful day, everything looked amazing, I can guarantee that didn't happen by chance. Someone has spent a long time thinking of every little detail to make that day perfect, from the colour theme and decorations to the music played. Below is a list of the details that you can photograph throughout the day:
  • Shoes
  • Flowers
  • Jewellery
  • Tiara
  • Veil
  • Wedding dress
  • Mens tie
  • Cuff links
  • Car
  • Cake
  • Food
  • Decorations
  • Wedding guest favours
  • Ceremony and reception venue
  • Ceremony programme


Thursday, 30 May 2013

Wedding photo list

I've had the privilege of photographing at a number of friends weddings, to be able to capture special moments for them to remember for a life time. Photographing someone's wedding is an honour, but it's far from an easy job and something that you really need to prepare for. In just over 2 weeks I will be photographing another dear friends special day. I thought I would share the following photo list with you as I prepare myself. I personally like to take a lot of candid, natural shots, but most bride and grooms will want a number for formal photos to be taken. Also having a list helps me to remind me what parts of the days I want to capture.


Bride at Home

__Wedding dress hanging up
__Zipping up/buttoning the wedding dress
__Mother of the bride fastening the bride's necklace
__The bride's garter
__The bride's veil
__A close up of the bride's shoes peeking out from under the dress
__Bride looking into a mirror
__Bride looking out window
__Bride and bridesmaids putting on makeup
__Bride pinning corsage/boutonnière on mother/father
__Bride with Mother and Father
__Bride touching up
__Bride and parents leaving for ceremony

Groom at chapel
__Groom tie close up
__Groom with parents
__Groom, best man
__Groom, best man, Dad
__Groom, grooms men/male friends

Wedding Photography Shots At the Ceremony
__Outside of ceremony site
__Guests walking into ceremony site
__Bride and father entering ceremony site
__Bride and bridesmaids/flowergirl
__bridesmaids
__flowergirl
__Ceremony musicians
__Officiant
__Close up of bride, just before she makes her entrance
__Bride and father walking down aisle
__The back of bride and father walking down the aisle – with the groom waiting in the distance
__Bride & Groom walking up the aisle
__Receiving line
__Bride & Groom outside on steps
__Bride & Groom hugging guests, laughing, getting congratulations
__Signing the marriage license
__Bride & Groom getting in car
__Bride & Groom in back seat

Posed Wedding Photography Before the Reception (These can also be taken before the ceremony)
__Bride alone (full length)
__Bride with Maid of Honor
__Bride with bridesmaids
__Groom with bridesmaids
__Bride with parents
__Bride & Groom together
__Bride & Groom with parents
__Bride & Groom with families
__Bride & Groom with entire wedding party
__Bride & Groom with flower girl and ringbearer
__Groom with parents
__room with best man
__Groom with groomsmen
__Bride with groomsmen

During the Reception (to help your photographer, you may wish to list these shots in the order they will happen at your reception)
__Outside of reception site
__Bride & Groom arriving
__Bride & Groom greeting guests
__Table centerpieces
__Table setting
__Bride & Groom's table (head table)
__Musicians or DJ
__Guest book
__Place card table
__Closeup of bride and groom's place card
__Wedding cake
__Gift table
__Decorations (specify which _________________________)
__A shot of bride & groom with guests at each table
__Bride with friends
__Groom with friends
__The buffet or, if having table service, a dinner serving
__Bride & Groom's first dance
__Bride & Father dancing
__Groom & Mother dancing
__Guests dancing
__Bride & Groom cutting the cake
__Bride & Groom feeding each other cake
__Toasts (specify who is giving them: ____________________)
__Bride throwing bouquet
__The getaway car
__Bride & Groom leaving party
__Bride & Groom driving away

Guests the photographer shouldn't miss: (provide your photographer with a seating chart so that he can easily identify them)
____________________________________________________________________________________________________________________________________________________________________________________________________________________________________________________________________________________________________________________________________________________________________________________________________________________________________________________________________________________________________________________

Wednesday, 20 February 2013

Sunsets

Three days in a row this week there has been a stunning sunset, with a red sky, a deep red sun and clouds in the sky. I love sunsets and of course all I want to do is get my camera out and capture it. Unfortunately I have been walking home from work on each of those occasions without my camera. By the time I have arrived home the sun has all but gone. At least it did make for an enjoyable walk home.

Capturing sunsets can be tricky, you have to get the lighting right, you've got the struggle of dealing with dark objects and a bright sky, dealing with fading light, you need to find something of interest to photograph as well as the sunset. I am far from an expert on this, but have included some of my own sunset photographs below for you to enjoy.

One website that I follow and take tips from sometimes is improvephotography.com, they have a web entry that will assist you if you want to learn more on sunset photography. Please click the link for 30 Tips for stunning sunset photography.


Thursday, 31 January 2013

Photo Comp

Original image
I just entered the below photo into a competition with Improved Photography. They provided the original file that needed some work on.

We were to edit the photo to improve it, then add our own touch the photo.

Her eyes were so striking that I wanted to make them the focus of this photo.

I used Lightroom 4 and Photoshop Elements 7 to do my edit. It was fun playing with the different tools in these two packages.

My edit

Wednesday, 30 January 2013

New lens - Tamron SP AF 28-75mm F/2.8

                                                                  
For a while I have wanted a new lens, actually there is always a long list of photographic equipment that I want, but it's not possible to have it all at once. I'm a Canon user and I really wanted to purchase the Canon L series 24 - 70 mm lens. But at over a thousand pounds it was going to take me a while to afford it. I knew Tamron did an equivalent lens, so did some research. 


Tamron have a 24-70mm F2.8 lens and a SP AF 28-75mm F/2.8. I decided to purchase the 28 - 75mm lens, mainly because it was the cheaper of the 2 lens. Money is a little tight at the moment and the 24 - 70mm Tamron lens wasn't cheap enough for me not to hold out till I could afford the Canon L series lens.

So far I have been very pleased with my purchase. I was photographing at a friends wedding as a favour a couple of weeks ago. Here's a preview of the photos I took of the beautiful bride getting ready the morning of her wedding, taken with my new lens.


Related Posts Plugin for WordPress, Blogger...